Improve unit testing in DXP using Arquillian Extension with Jacoco Report
April 27, 2022
Arquillian is a Java EE testing platform that performs testing for java classes on containers. Liferay DXP / 7 offers Arquillian Liferay extension that can be used to test Liferay plugins along with their OSGI components. In this blog, we will see how we can write and execute Integration test using this extension in Liferay.
Note : Using Arquillian Liferay extension one can write functional tests. In this post, we are going to implement integration test. I will post a separate blog on how functional test using Liferay Arquillian extension.
For more Information on Arquillian, you can refer http://arquillian.org.
Lets start with creating Liferay Portlet Skeleton. You may use blade command line (If it is installed on system) or using LR IDE.
Create a package under src/main/java for service related classes. Don’t miss to create folders for test classes and resources under src folder. You can refer a sample structure below.
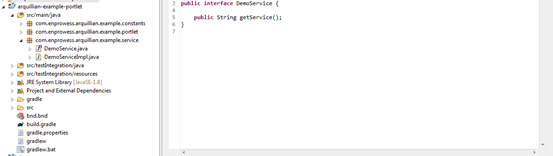
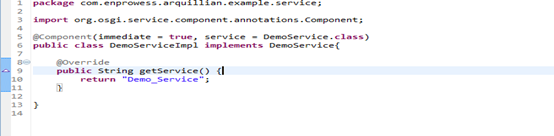
Define OSGi service interface and its Implementation class inside a package created for service classes.
Next, we will see how Arquillian Liferay extension injects implementing class object using @Inject annotation and performs a test on container at run time.
Create a Test class as follow,
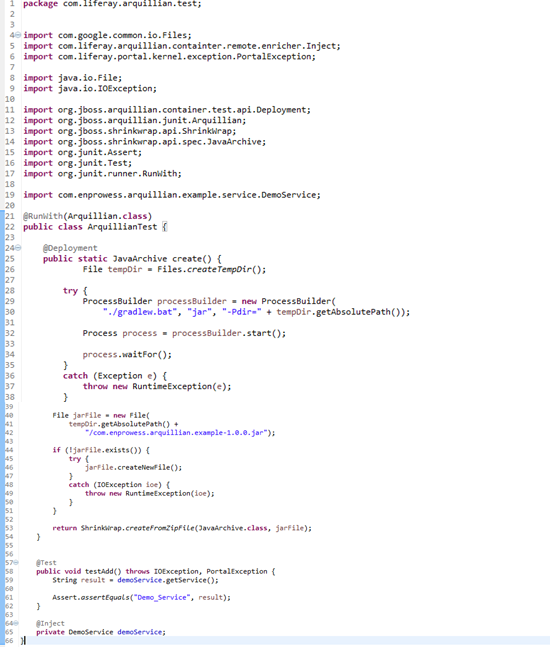
In ArquillianTest.java class, @RunWith(Arquillian.class) is a JUnit annotation that asks Arquillian to execute test.
Method testAdd() is a test method marked with @Test, that calls getService() method on “demoService” object and checks for assertion.
Note: ’demoService’ variable gets populated with implementation object of DemoService.java interface (DemoServiceImpl.java in our case).
@Deployment must be annotated to a ‘public static’ method that returns a test archive file (i.e create method above).
ShrinkWrap API creates Test Archive.
For more on ShrinkWrap – http://jboss.org/shrinkwrap.
Name of test archive file is identical to ‘Bundle-SymbolicName’ in bnd.bnd.

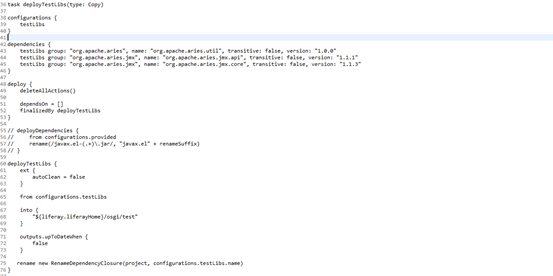
Set dependencies as below inside plugin’s build.gradle file.
![]()
Create arquillian.xml under src/testIntegration/resources package and configure deploymentExportPath as shown below.
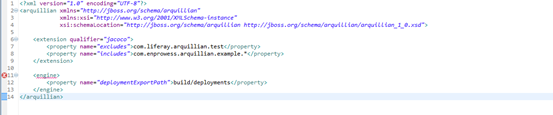
Before deploying jar files on container, Arquillian exports test archive file (in this case it is com.enprowess.arquillian.example-1.0.0.jar) on this path. This file contains all the test related files that can be used for a reference.
Finally, Arquillian uses remote protocol such as JMX for testing purpose. To enable JMX, Set Java runtime Options to Tomcat setenv.bat file (setenv.sh on linux machine).
Following image shows runtime options in setenv.bat(windows machine) that enables JMX on port 8099 in Apache Tomcat.
![]()
Arquillian uses JMX API Implementation of Apache Aries JMX. Below are dependencies to install for Apache Aries JMX,
![]()
One can Install them from Apache Felix gogo shell or by setting gradle tasks in build.gradle as follows.
For more Information on installing these dependencies, one can refer https://dev.liferay.com/develop/tutorials/-/knowledge_base/7-0/arquillian-integration-test-example
Now, Let’s configure Jacoco which is a code coverage library for java. For more information on jacoco, please visit http://www.eclemma.org/jacoco/
Jacoco requires attaching Jacoco agent to JVM, Configure this runtime options in setenv.bat as follow,
![]()
Or, by configuring setUptestableTocat task in build.gradle as under.

Next, Add following instructions inside jacoco build.gradle file.
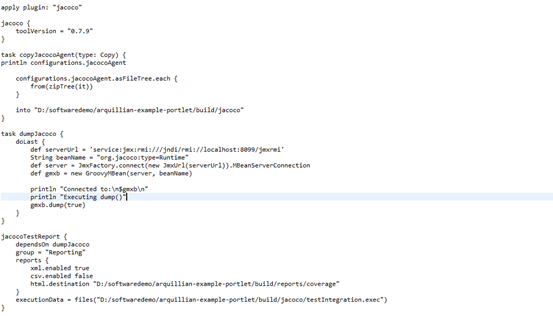
jacocoTestReport task will run as part of testIntegration task which starts execution of test. Configuration of testIntegration
Task will look as follow,

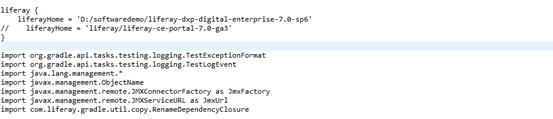
Finally, Configure Liferay server on which Arquillian need to execute tests and put import statements for the classes,
You can set tomcat startup time as below.

Open a terminal to project root path and execute command as shown under:
You can set tomcat startup time
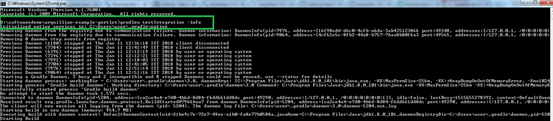
It should take few minutes to execute, since it starts liferay tomcat first and runs arquillian test after. It automatically stops tomcat after execution of test.
After successful execution, success message will look like below,
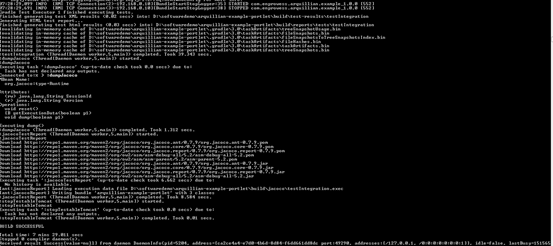
You can see result on following path,
For Arquillian Test Execution,
…\arquillian-example-portlet\build\reports\tests\testIntegration\index.html
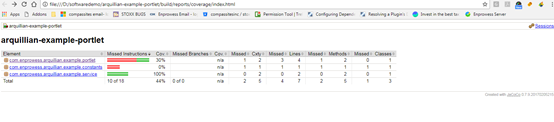
For Jacoco Coverage,
…\arquillian-example-portlet\build\reports\coverage\index.html.
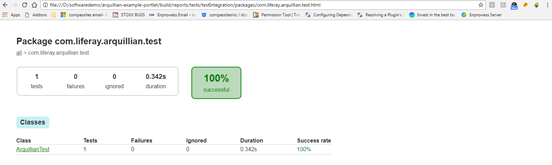
Jacoco report will look like following test result screenshot,
Arquillian Test Result:
Jacco Coverage Report:
Hope this is useful.
Post by,
Ripal Thakkar